In 2019 Dalhousie University in Halifax did a study on Home Food Gardening during COVID-19 that suggests 51% of respondents grow at least one variety of fruit or vegetable in a garden. Of those, 17.4% started growing food at home in 2020 during COVID-19—that is almost one in five Canadians. A total of 67% of new gardeners in 2020 agree that the pandemic influenced their decision to start growing food at home. (Full study notes: https://www.dal.ca/sites/agri-food/research/home-food-gardening-during-covid-19.html)
What is truly amazing is that trend continues today – to the point that many seed growers aren’t able to keep up with the sudden increase in demand; some seed supplies are limited (but they’ll get there, don’t worry!).
The Year of the Garden 2022 was proclaimed by the Canadian Garden Council to celebrate the 100th Anniversary of Ornamental Horticulture in Canada and it officially launched on the first day of Spring – March 20, 2022.
Everyone in Canada, including individuals, and those in organizations, schools, churches, colleges and universities, clubs, societies, businesses, and municipalities are invited to Live the Garden Life and Plant Red during the Year of the Garden 2022.
Plant Red to pay tribute to lives lost, or honour frontline workers during the pandemic. Or Plant Red as an expression of your Canadian Garden Pride in 2022.
Share your garden. Register your Plant Red Garden at no cost, by submitting a photo of your garden. Your entry will be pinned on the map (by community not exact location) and you will receive a special downloadable Plant Red Garden Certificate of participation.
There are a multitude of REDS that we can plant in our gardens, containers, balconies and decks – whether it’s fruit, foliage, flowers or vegetables, there’s something for everyone. But wherever you live, let’s all celebrate what matters to each of us, and LIVE THE GARDEN LIFE!
Fewer things are more frustrating for gardeners than strolling through the yard, admiring years of hard work, only to discover prized roses devoured by aphids and foliage eaten, chewed and destroyed by mealybugs or mites. Fortunately, not all insects damage plants and turn the gardening into a feasting ground. Lucky for us, many insects feast on those same insects that cause the damage. Encourage beneficial insects into the garden with the right plant, and a clean environment and let them take care of removing the unwelcome ones.
Here’s a few of the good ones:
Lady Beetles:
Also known as lady bugs, lady beetles eat aphids, whiteflies and other soft-bodied insects that are often found destroying bright blooms and plant foliage. Round to oval in shape and usually spotted, lady beetles consume up to 50 aphids per day once weather conditions warm up. The young larvae will eat up to 400 per day before transforming to adult insect. Dormant lady beetles are available for purchase at some garden supply centers and when released into the garden will start to do their magic.
Mantids:
Also called praying mantis, this odd-looking insect will devour any garden pest. Large front legs grasp at prey, and their large triangular heads allow them to observe and search for pests at any angle with minimal effort. Eggs overwinter in pods attached to solid surfaces, and young mantids hatch in early spring, quickly beginning their search for food. Available from many garden centres, dormant egg pouches will give the garden a good head start in the fight against bad bugs in early spring as the mantids burst out.
Lacewing:
One of the most effective beneficial insects, lacewings will take care of caterpillars, aphids, leafhoppers, whiteflies, mealybugs and insect eggs. The larvae of lacewings look like tiny quarter-inch alligators and the adult develops greenish-blue lacy wings that carry it from plant to plant in search of prey. Plenty of flowers will keep lacewing working in the garden, as the nectar provides the lacewing with the needed energy for hunting.
Beneficial Nematodes:
Beneficial nematodes are microscopic worms that work under the soil surface, removing grubs and larvae that grow into plant-damaging flying insects like Japanese beetles. Different nematodes attack different pests, so ensure you have the right predator for the job before applying them to the lawn area. Nematodes are used for insects that spend part of their life cycle underground, where the nematodes wait for the pest to move through the soil, and then take action and destroy it.
Parasitic Wasps:
Parasitic wasps grow to varying sizes and prey on a number of caterpillars including cabbageworm, tent caterpillars and tomato fruitworm. The trichogramma, one parasitic wasp the size of a speck of dust, lays up to 300 eggs inside pest larvae, destroying the developing insects. Larger wasps lay their eggs on the caterpillar and as the eggs hatch, they kill the insect. Parasitic wasps are also a good defence against aphids.
Other Considerations:
Plant a variety of flowers that attract beneficial insects, to keep them working in the garden all season long. Keep the garden clean to eliminate spots for the bad bugs to hide, and as plants fade or go dormant at the end of the season, remove any debris from the garden. Remove or prune damaged or weak plants during the season because these can become targets and home for garden pests
Looking out the window to see deer frolicking in the distance is a magnificent sight. However, when the frolicking turns to feasting on favorite plants and shrubs, the beauty of the view turns to one of frustration, and the time and dollars needed to repair, replace or replant the damaged bushes. Fortunately, for avid gardeners and nature lovers, there are shrubs available that deer do not put at the top of their favorite food list and will tend to avoid in search of tastier treats. Here’s a few to consider.
Flowering Shrubs
There are some flowering shrubs that deer prefer to avoid. Flowering varieties add color to the garden and many attract butterflies and birds to the area. Lilac (Syringa spp.) is a medium to large shrub that produces large, vibrant flower clusters each spring, changing to dark green leaves once the flowering is complete. Lilacs are available in a range of colors including pink, white, purple, blue and mixed. Lilacs are hardy to zones 1 through 12.
Butterfly bush (Buddleia spp.) is a nonstop bloomer and a true butterfly magnet. Growing from 6 to 15 feet tall, depending on the variety, the butterfly bush produces an abundance of flowers all season long. Hardy to zones 3 through 9.
Angel’s trumpet (Brugmansia spp.) grows into a large, mounding shrub, full of long trumpet-like flowers that grow up to 10 inches long. A fast-growing shrub, flower colors include yellow, apricot, pink and white. Hardy to zones 7 through 13, but can be grown in containers and overwintered inside in lower hardiness zones.
Bluebeard (Caryopteris spp.) sprouts blue blossoms from midsummer until frost arrives. A smaller shrub, bluebeard grows to 4 feet high and wide, depending on the species. Bluebeard prefers full sun, and the other flowering shrubs listed above will grow in sun or part shade. Bluebeard is hardy to zones 4 through 9.
Evergreen Shrubs
Evergreen shrubs add year-round color to the garden and some are distasteful to deer. Boxwood (Buxus spp.) is a breeze to care for and can be left alone to grow naturally, or pruned and kept at a specific height or shape. A dense evergreen, boxwood grows from 1 foot high for dwarf varieties to 7 feet high for other varieties. Hardy to zones 2 through 12.
Holly (Ilex spp.) varieties range in size from 1 foot high to up to 50 feet high. Smaller varieties create low hedges and the larger varieties work well for areas needing privacy or tall hedges. A dense shrub, prune any damaged or weak branches to promote new, healthy growth. Hardy to zones 4 to 9.
Mexican orange (Choisya ternata) quickly grows to 8 feet high and wide. Small flowers sprout during spring and summer, and shiny, dark green leaves fill in this shrub throughout the year. Hardy to zones 6 to 9.
Coprosma (Coprosma spp.) is a colorful evergreen shrub that spreads to 8 feet high and wide depending on the variety. Needing little water, the leaves on various types of this shrub are variegated with bright color. Hardy to zones 8 to 10.
Deciduous Shrubs
Various varieties of the Cotoneaster (Cotoneaster spp.) shrub are deciduous and one of many shrubs avoided by deer. Cotoneaster can be a low-growing shrub, or sprout to 25 feet high depending on the variety, but is easy to prune. Simple white flowers develop in spring and small, glossy leaves cover the plant the balance of the year. Hardy to zones 3 to 12.
Spirea (Spiraea spp.) grows to 6 feet high and wide, is easy to grow and adapts to any soil condition. Bridal wreath varieties develop clusters of cascading, white flowers and the shrub types develop small pink or white flowers in the fall. Leaf color varies by cultivar. Hardy to zones 3 to 12.
Elaeagnus (Elaeagnus spp.) are fast-growing shrubs that require almost no care. Dense and tough, deciduous varieties have silver-gray leaves that appear to sparkle in the sunlight. This shrub is heat and wind resistant. All varieties listed will grow in full sun or partial shade. Hardy to zones 2 to 12.
Shrubs With Berries
Attract birds instead of deer to the garden with deer-resistant, berry-producing shrubs. Current (Ribes spp.) plants provide dense growth to 12 feet high and wide, depending on the variety, and drooping clusters of white flowers develop into masses of sweet dark berries. Hardy to zones 2 to 12.
Mahonia (Mahonia spp.) is an evergreen shrub, sprouting bright yellow flower clusters that develop into dark bluish berries. The spiny foliage of mahonia can snag and this shrub is best planted away from heavy traffic areas. Hardy to zones 2 to 12.
Beautyberry (Callicarpa spp.) grows to 6 feet high and wide and produces pink or lilac colored flowers that develop into round, purple fruit. The berries remain on this shrub well into the winter months. Each plant listed grows in full sun or partial shade. Hardy to zones 3 to 9.
Wherever you live, chances are there will always be visitors to your garden that enjoy munching on what you grow, but try some of these and when you see the deer, you’ll just smile and enjoy the beauty of both the deer and your garden shrubs.
Also known as Pumpkin on a Stick, the ornamental eggplant is a truly fascinating plant.
Not overly exciting at first, it quickly grows into a bushy, tall plant with 4- 5′ solid stems that develop large, prickly leaves (actually, rather spikey – just like a “regular” eggplant).
An abundance of small white and purple flowers appear over the summer that look almost the same as the flowers on a potato plant…and considering these are both plants from the Nightshade family (solanum), it makes sense.
The flowers grow into small ribbed “pumpkins” – these tiny gems (2.5″) start out green in early August and as fall approaches turn a vibrant orange. The stems can be cut and used in fall decorations, or leave the plant where it is for fun colour and plenty of interesting comments until the frost hits.
They are easily started from seed, indoors, about 8-10 weeks before the last expected frost for the area.
These make a fabulous front container garden display or look great in any part of the garden.
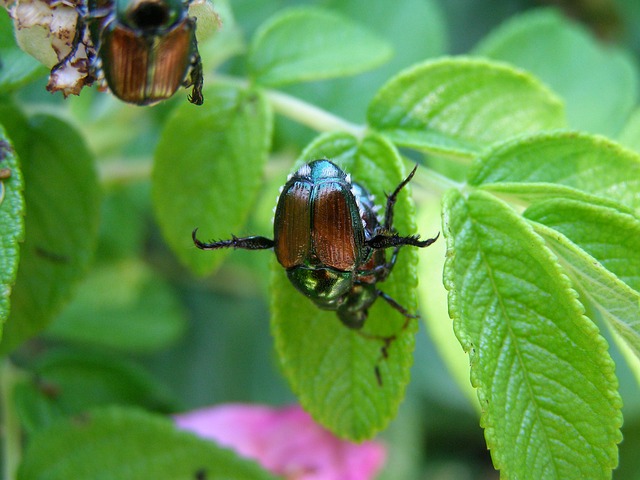
Nothing is quite as frustrating for gardeners as strolling outside, admiring their hours of hard work and discovering plant damage. It becomes even more annoying to see the foliage and at times, flowers of your prized roses, dinner plate hibiscus, morning glory vines, or lush pole bean plants riddled with holes while the culprit brazenly sits upon yet another damaged leaf, staring back as if daring you to flick it away, in hopes of landing on its next unsuspecting victim.
Discovered in North America in the early 1900s, the Japanese beetle is one of the most destructive garden pests around today. Measuring about a ½ inch long, with an attractive shiny metallic-green body and copper coloured wings, the list of plants this beetle avoids is short, tending toward trees and most garden selections including fruit, flowers, vegetable plants and foliage. They are all at risk of becoming part of the beetle’s summer diet.
Japanese Beetle Larvae
These voracious eaters begin their garden buffet at an early age. Unlike moles or other underground garden rodents that clean off grass roots and cause temporary disturbances in the lawn, the Japanese beetle larvae devour roots, destroying lawns and killing young vegetable seedlings. While it prefers well kept and fertile turf areas, the Japanese beetle larvae is not terribly picky and will destroy vegetation in just about any type of soil conditions. The larvae (grubs) begin as eggs planted shortly after the adults emerge from the ground in spring and each female beetle lays up to sixty eggs per season that develop into full-grown grubs by the end of summer. The grubs burrow deep into the soil as the temperatures drop from fall to winter, and head back to the soil surface in the spring as the warmer weather returns, where they feast on plant roots for up to six weeks before becoming adults and leaving their childhood home in search of foliage and flowers.
Adult Japanese Beetles
A single Japanese beetle wandering through the foliage will do little harm, but it is rare to find this pest travelling solo. Usually feeding in groups, the adult beetles chew through plant tissue beginning in late June, leaving behind an irregular, lacy-looking version of what the foliage or flower once was. Typically starting at the top of their chosen plant, the beetles eat their way down the vegetation and when done, fly off to their next meal. During their short seven-week life span, Japanese beetles will feed fervently on hot summer days, focusing on plants grown in full sun, eating less on days with cloud cover or wind, and staying away when rain is falling.
Control Options
Controlling Japanese beetles is challenging. Dealing with one life stage does not always ensure elimination of the next and with adult beetles flying from location to location, numerous families of beetles may visit over the course of the season. Beneficial nematodes attack grubs and are best applied as the young return to the soil surface. Nematodes need moist soil conditions and soil temperatures of at least 68 degrees Fahrenheit to be effective. Adult beetles can be hand-picked from plants or shaken from their perches into soapy water early in the morning, while still sleepy. Removing the pests from the plants reduces the number of beetles that assemble; they prefer to gather in numbers, and feeding beetles attract further pests to the same plant. Chemical controls are available for Japanese beetles, but local laws may or may not permit their use. Japanese beetle traps work well, using pheromones and food scents to lure the insect and can capture hundreds of adult beetles over the summer. Placement of the traps is tricky though as plants on the trap route may fall victim to the beetle before making its way into its final destination. And if your neighbours aren’t using them, you’ll get all of theirs.
Over the past couple of years, I’ve stopped using the traps and have seen a huge reduction of these beetles in the yard. Sure, I still have some, but removing the traps seems to have stopped them from arriving in hoards and staying. It’s a personal choice, but I’d say, worth a try.
I tried a few new squashes last summer and in my opinion grew the best one ever. Renee’s Garden Seed – Baby Butternut Squash, Honey Nut. It was an outstanding performer with outstanding flavour and the only squash I plan to grow this year.
A petite, light-weight and colourful squash, baby butternut grows “up” perfectly on a trellis or A-frame with no need to add supports to the fruit. When they first appear, they dark green and when ready to harvest are an interesting and unique darkish orange colour.
Certainly worth trying and great for any size garden. Can easily be grown in a container and suitable for small-space gardens or balconies that receive lots of sun.
I never seem to have much luck with peppers but last year I tried Renee’s Baby Belle and Yummy Belle peppers. Holy Moly! These were fabulous. Small-sized, sweet, non-stop producing peppers. Perfect right off the vine, and I liked the smaller size as well for grilling and cooking. I already have these growing indoors getting ready for the summer heat. Also great for any size garden. Grow very well in containers.
Looking for a small-size cabbage with amazing flavour? Try Pixie cabbage. I really only bought this one a few years ago because we had a cat named Pixie. But once we tried it, it became a regular in the garden. I cover it with floating row cover to keep the cabbage moths away while it’s growing and that seems to work well. I’d also recommend succession planting…start them indoors, but plant them every couple of weeks to enjoy a continuous supply right into the fall.
Like it or not, it’s that time of year again. Falling leaves – or those pesky leaves that seem to blow onto your lawn from every other tree in the neighbourhood. But what happens if you just leave them alone?
You can – for a while, but a heavy layer of maple, oak or other large leaves won’t keep your lawn healthy over the winter and will end up creating more work, and expense, when spring arrives.
Here’s the risk – a heavy layer of leaves, particularly left under an even heavier layer of snow will start to smother the lawn. It can’t breathe and therefore creates the perfect environment for diseases like snow mold and brown spot to develop – not to mention the pests that might decide to move in as well. The weight might also prevent new grass from sprouting in the spring. That leaf-layer presents a barrier to water, nutrients and air that the root system needs to survive.
But that doesn’t mean every single leaf needs to be removed – here’s a few ideas to reduce the risk and make good use of the nutrients that leaves can offer, when used correctly.
Run the lawn mower over them. Your lawn will love you for it. Those finely shredded leaves will fall between the blades, adding both a fertilizer and mulch to the yard – which in turn helps reduce the number of weeds in the spring and provide healthy lawn growth.
Shred some for the garden beds. They’ll break down over the winter and will reduce the amount of time and money spent in adding nutrients before planting season starts again.
And don’t forget your compost pile, it would welcome a good helping of shredded leaves.
And if shredding isn’t your thing, then get out the rake, enjoy the warm autumn sun and bag them up in paper leaf bags (vs. plastic) so they can be taken to (or picked up – depending where you live) the local composting station…and who knows, when you go pick up compost in the spring…you might just be getting your own nicely-composted yard waste back!
Oh….and a good jump or two in the leaf pile won’t hurt a thing!
There are hundreds, possibly thousands of different daylilies but Daylily ‘Happy Returns’ (Hemerocallis ‘Happy Returns’) is one of my favourites. A non-stop summer bloomer, Happy Returns presents 3-inch, butter-yellow flowers similar in appearance to early spring daffodils. It’s smaller size (2 feet high) makes it perfect for a garden border, a perennial bed or containers. It grows well in full sun but does appreciate some morning or afternoon shade. Hardy in zones 3 to 9, it’s not fussy on soil type and pollinators love it. A bright addition to any garden – large or small!
For those of us that like to grow-our-own flowers and vegetables, that time is once again here. The ability to walk around the garden at the end of the day collecting dinner or cutting flowers for the table is truly an exciting experience. Every time I take that walk, I am overwhemed at what I have created from just a tiny little seed.
Here’s a few things to consider if you plan to grow from seed (and if you don’t, give it a try – it’s easy!).
Use the best quality seed you can afford. Invest in the time to look through various seed company websites or catalogues to compare prices and available products. If you have some seeds but are unsure of how old they are, or where they originated, you may want to consider buying new. What you have may perform okay, or it may never sprout. It’s hard to say. The typical rule of thumb is that seed viability decreases by 50% each year, but I have used seed that is 2-3 years old and it has been ok. I’ve also used some that hasn’t. It seems to vary by brand. Some seed companies do guarantee viability for up to 2-3 years, some only for that year that it’s packaged for.
Plan what you are going to grow before you buy so you don’t end up with too much seed – and as a result, spending too much money. I have a map of my garden that I created in excel, nothing fancy, but each year I decide what vegetables are going where and from that I determine the quantity I need to purchase.
Good lighting is essential. Most seeds need light to germinate. However, there are some exceptions to the rule – geraniums need total darkness germinate, as do a few other flower varieties. Which brings to my next point – read the seed packages. I have had so many failures because I either did not read the package instructions at all, or did not read the entire package properly. Some seeds need soaking overnight for effective germination, some need nicks or cuts in them. Use the information on the packages to understand what the seeds need for the best possible outcome.
Seeds need heat to germinate. If you are starting seeds in a cooler area consider adding seeding heating mats to your inventory. They sit under the trays and keep the soil at the optimum temperature for healthy growth. 60° to 70°F (16-21°C) – however some plants like lettuces and greens will germinate at slightly lower temperatures.
If you are using growing stations – here’s another thing I wasn’t aware of when I started. Start your lights as low and as close to the seeds as possible, gradually lifting them as the plants grow. If you leave them up high right from the start, your plants will grow, but they will be weak and leggy and probably won’t survive. I learned that the hard way!
When planting seeds indoors, use a good soilless potting mixture. This provides the needed air circulation and good drainage, and typically these mixtures contain no diseases or pests. Garden soil is too heavy for young seedlings, it often has poor drainage and almost no air circulation – and may contain pathogens that little plants can’t fight.
Use the seeding guidelines on the package. It will tell you how far in advance of the usual last frost date to plant and if they should be planted indoors or if they can wait until and be planted directly in the garden. Some plants prefer the cooler weather and can go in the garden early, some need the summer heat. When in question for any part of seed starting – follow the seed package instructions and information – the seed growers know what they’re doing! I learned that the hard way as well!
Hardening off – the final step. Flowers and vegetables that grow from seed need to be hardened off before they head to the garden beds. The process for that begins a week or two before planting (longer is better) and consists of gradually introducing them to the elements every day and then bringing them back inside where they are safe. Start with just a couple of hours outside in a shady spot. Do that for two to three days and then introduce them to a few hours of dappled shade with some sun exposure. Then increase the time and provide a few hours of direct sun for a day or two. Next provide them with a longer period of time in direct sun and eventually leave them out overnight for a few nights. This process allows them to gradually get used to the intensity of the sun along with windy conditions. Plants that have not been introduced gradually to direct sun may show rapid and dramatic signs of shock. The leaves may become bleached out, will turn white and may curl under, or simply fall off. Sudden transplant shock can even kill many young plants. (Another lesson I learned!)
What’s best to start indoors? Tomatoes, peppers, eggplant, broccoli, brussels, cabbage, cauliflower, ground cherry, celery, perennials and herbs.
Best for either starting ahead or directly in the ground? Greens, kale, chard, cucumbers, squash, melons, sunflowers, zinnias, marigolds
Best for sowing directly in the ground? Peas, carrots, beans, corn, radishes, parsnips, onions, turnips, morning glory, scarlet runner, sweet pea.
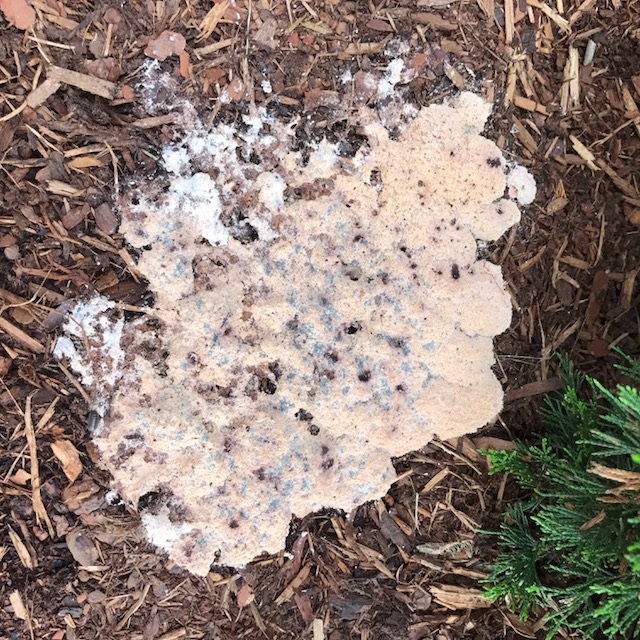
Yep! That’s what it’s called. And those of you with dogs (or cats) will certainly see the resemblance. This little gem (pictured) startled me one day on my way to the back door and I wasn’t completely sure how it got there.
Dog vomit fungus (Fuligo septicai) is most often found sprouting on wood mulch or lawns during warm, wet weather – and has a tendency to magically appear overnight. Technically a slime mold, dog vomit fungus varies in color from bright yellow to an unpleasant orange tone as the mold begins its fruiting stage. As the slime mold ages over the next couple of days and conditions dry out, it becomes a dark, hard mass, then turns into a crusty mound and eventually moves into the spore state.
Migrating to moist and shady areas, the wind-borne spores patiently wait for the right conditions and when they arrive, absorb that extra moisture and open up to start the process all over again, producing a brand new patch of vomit-like mold.
While odd looking, dog vomit slime mold is harmless and won’t damage plants. It will disappear on its own within a few days, but if you prefer you can break it up with a rake or use a trowel to remove it before the spores develop.