Want to grow a fun, non-stop vegetable? Then plant Rat’s Tail Radish.
Unlike the traditional underground, round, red radish, rat’s tail is an edible pod that sprouts from pale pink flowers that in turn, sprout from long, flowing stems.
A non-stop summer performer, rat’s tails are easy to grow and won’t fade away in the heat like most radishes do. This is certainly not a cool-season radish – they thrive during warm summer days and prefer full sun. Similar in appearance to a long bean, (and a rat tail!), this edible pod is delicious fresh from the garden, is a great addition to stir-fry’s and is also an easy pickling vegetable.
Butterflies flock to the flowers and continued pod harvest will also continue to produce new flower growth and in turn, more radishes.
Rat’s tail is an Asian heirloom that was introduced to the U.S. in the 1860s and has been growing ever since. Plant this interesting, easy-care and colourful radish every two weeks over the season for a continued harvest.
Black walnut trees can grace a yard, provide plenty of shade on hot summer days, and produce delicious nuts that both humans and squirrels enjoy. But those same trees aren’t always the best neighbours for the rest of the plants found in the garden.
Walnuts are members of the Juglandaceae family and produce a chemical called juglone that is toxic to many plants and vegetables. Juglone is found in every part of the tree but is most prevalent in the flower buds, nut hulls and roots. And those roots can extend up to four times the diameter of the tree’s canopy.
The science behind juglone is that this chemical is a respiration inhibitor which deprives sensitive plants of needed energy for metabolic activity, thereby causing nearby plants to struggle to survive, or not survive at all. Symptoms of walnut toxicity range from stunted growth, to partial or total wilting, to death of the affected plant. The toxic reaction often occurs quickly and sensitive plants can go from healthy and vibrant to dead within a couple of days.
So what does this mean for gardeners that want a diverse, vibrant garden?
There is actually a long list of plants that are tolerant to juglone (see below), but if the plant begins to looks stressed or is struggling to grow, it might be best to remove or relocate it.
Plant as far away as possible from the black walnut. Consider using raised beds to move the roots further away from any contamination in the ground. Remove any debris or nuts that do gather in the bed and ensure good drainage – it seems to help.
The toxicity can remain in the soil for years once the tree has been removed – the only way to truly ensure elimination is to remove all the roots as well.
Juglone will eventually break down in composted leaves, but it takes time. It’s best to either dispose of the leaves or compost them separately and use that compost on non-sensitive plants.
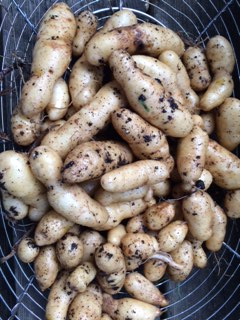
Thought I would share my website link on “Growing Potatoes in Bags”. I have so much interest in this when I talk about it and a number of people have shared their success stories with me. It’s a method that works. And great for small gardens, patios or larger gardens that need the space for other veggies.
Use whatever potato grows well in your zone. Here in zone 5 I’ve used Russian Banana Fingerlings (shown on link below) and Russian Blue – this year I’m trying Yukon Gem.
If you don’t already, consider growing native plants in your garden. Plants are considered native if they originated and are growing naturally in a given area; they have adapted to the soils, the regional climate and wildlife – and will continue to survive climate changes like floods, drought, blizzards and frost. The list of benefits, and plants is long – and worth it in the end. Here’s a few reasons why we should all be growing native…
Reduced Maintenance:
While there is no such thing as a no-maintenance garden, native plants offer a very low-maintenance alternative. Because they are resistant to pests, disease and drought, they don’t required the same level of attention that many other tender plants need to survive. Well established natives have deep roots that support them through dry times, they rarely require fertilizer and they help deter weeds and invasive species from moving in and taking over the garden.
Soil and Water Conservation:
The deep root system of native plants increases the soils’ ability to store water and keeps that soil where it belongs. Natives also help reduce water runoff; their dense growth and large, lush foliage allow rainwater to drip into the soil rather than pooling around the plant or draining away. Native plants require far less watering than their non-native neighbours need, and they are strong, long-lived plants that rarely need replacing, providing overall good value for your gardening dollars.
Wildlife:
Native plants provide wildlife with the habitat they need to survive. If you grow them, they will come. And stay. Native plants naturally produce the seeds, berries, nuts and nectar that the local wildlife enjoys. Natives provide a protective cover for wildlife – provide seeds, nuts and berries for mammals, seeds and fruit for birds, nectar for hummingbirds, bees and butterflies, and host plants for butterfly caterpillars. Plant a swamp or common milkweed; it’s the only larval plant that the monarch caterpillar lays it’s eggs on – bring monarchs back into your garden!
A Garden Full of Beautiful Plants:
There are native plants available for every garden location – sun, shade, water, rock gardens and woodlands. Wildflowers in bloom combined with native grasses and ferns provide a stunning visual in any setting. Many native plants provide impressive, showy flowers, colourful berries, unique nuts and seeds and stunning fall foliage
Create a Wetland:
Add water features (or a pond) to your yard to encourage frogs, toads, dragon and damselflies to move in, and to provide a water source for birds and butterflies. These wetland creatures will thank you by working to keep the mosquito population down during the summer season. Use a variety of native plants in the pond, add large rocks and old logs to provide spots to soak up the sun and create mini-wetlands near a smaller water features by planting bog or pond plants in buried plastic containers to keep the roots wet. It won’t take long before your wetland neighbourhood starts to fill up.
Adding even a few natives into your current landscape each year will help to encourage a healthy and sustainable ecosystem you can enjoy for years to come. Grow a native plant – and save a life!
Cold winter months and high winds can play havoc with the health and wellness of many of your shrubs and evergreens. Here’s a few simple tips to keep your landscape staples safe and provide the care they need to flourish once again when the warm weather returns.
Water: Make sure all your evergreen trees and shrubs continue to be watered during a dry fall, and give them a good, thorough watering before the ground freezes. Evergreens don’t lose their leaves like deciduous plants do and need to store water for the winter to prevent them from drying out. Add a layer of mulch for added protection.
Damage: Snow on your shrubs is both good and bad – snow layered around the base can add extra insulation and protection – heavy snow on the branches can cause branches to bend and break. Gently remove any heavy snow buildup, starting at the bottom, to avoid damaging any weakened branches.
Coverage: Well-established evergreens are typically fine without being covered, but young, new plants may benefit from a burlap tent. Pound stakes into the ground around the plant and wrap the burlap around the stakes. This allows for good air circulation around the shrub, the ability to brush off heavy snow and provides protection from high winds that might hurt young branches.
Critter Protection: As the natural food source starts to dwindle, wildlife may turn to shrubs for sustenance. Protect possible targets with chicken wire, fences or barriers to make it difficult for wildlife to get to the plants. Alternatively, provide feeders for deer, squirrels and birds away from the shrubs – that way you are helping both plants and animals to survive the often far-too-long winter.
Wanted to share this link from the National Gardening Bureau with some very interesting gift ideas for those on your list that enjoy spending time outside.
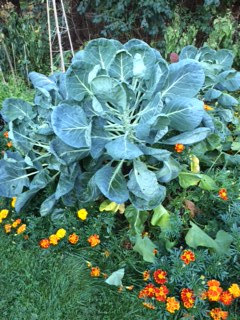
I’m going to be perfectly honest, as much as it pains me. Last year, for the first time ever, I decided to grow Brussels sprouts. In pots. About 6 plants per pot.
I can almost hear the collective chuckle from those of you that are familiar with or know how to grow Brussels.
Here’s a picture of one of my plants this year:
It’s a good 3 feet high and almost as wide. So…imagine 6 of these in a pot. They didn’t survive beyond about 4 inches and didn’t even come close to sprouting sprouts. It was quite an aha moment for me when I toured the Royal Botanical Gardens last fall and saw how these interesting veggies should be grown.
Brussels like the cooler weather, so start them early, indoors, if you can. Six weeks or so before the last frost for your area. Plant the seedlings 12 to 24 inches apart (and not in pots) outdoors when the frost risk is over and give them plenty of water, fertilizer and sunshine. I had mine in the ground the first of June and am harvesting now.
Our summer here was extremely hot and dry (unusual for this area), so not the best climate for Brussels, but I certainly had more success this time and will definitely grow them again next year. The excess heat tends to stop the sprouts from forming a compact ball, l so I did end up with some unformed, loose leaves.
They mature from the bottom up along the stalk and as they reach about 1 inch in diameter are ready to harvest. Or you can wait and cut the entire stalk.
These actually look big and showy in the garden and are fun to grow.
However, I haven’t completely given up on my pot theory, but maybe I’ll try just one in a pot next year…
Brussels sprouts on one of my plants, and a full stalk from another cut down.
I had someone ask me that question the other day – and either way, you don’t want them in the garden.
Both are plants that cause a red, itchy rash – sometimes blistering, as a result of contact with the oil contained within the plant – urushiol (yoo-roo-she-all). You will get the rash from contact with any part of the plant, flowers, berries, leaves, roots – even dead ones – so always wear long gloves and eye protection when erradicating poison ivy or oak. You can even get the rash from touching something that has come in contact with the plant – clothing, tools, even pet fur.
Eliminating poison ivy and oak takes time. Don’t burn it, inhaling the smoke can cause health problems including inflammation of the nasal passages and lungs. Smaller patches can be dealt with by regular hoeing and breaking up of the plants. They won’t continue to grow or spread if they don’t flower and develop berries. Regular mowing of larger patches will eventually eliminate the weed, but be sure to wear protective clothing and boots to avoid rashes on your legs or feet. Wash your clothes and boots well after a task like this, the oils will remain until safely removed. Poison ivy and oak do take time to remove and you may see the odd stem sprouting up over the season, but as long as you know where it is, you can avoid it until it’s no longer a threat.
And if all else fails – get a goat! Goats actually enjoy muching on this plant. They’ll have it gone in no time!
Both plants can be identified by their distinct 3-leaf arrangement. Poison ivy can grow as a shrub, reaching up to 4-feet high, as a groundcover, or climbing vine. The almond-shape leaves range from light to dark green and turn brilliant red in the fall. Poison ivy produces flowers, and then small berries that are a beigy-grey-white shade.
Poison oak has a scalloped 3-leaf arrangement that looks very similar to true oak leaves. Grown as a dense shrub or climing vine, the leaf shades vary from bronze to bright green to red, depending on the season.
We’ve been experiencing one of the hottest and driest summers in years. It’s what I call a “good old-fashioned summer”. The way summer is meant to be. And while I’m watering a tad more than I like to, the heat sure is keeping it’s end of the bargain and the veggies are growing better than ever.
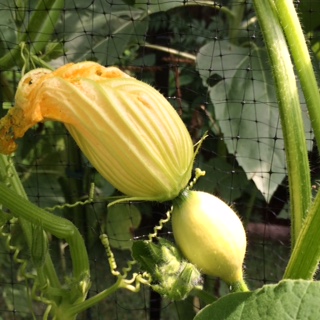
One way to make use of small space, or to just provide more room to grow other plants is by “growing up”. I’ve made simple bamboo trellis’ for both cucumbers and squash to help keep the fruit off the ground and save the space for other veggies (like the sweet potatoes, which are growing like crazy!)
These trellis’ are made up of three or four, 6-foot bamboo poles, from the dollar store, wound with a strong string, or light twine. The twine allows for the gentle tendrils of the plants to grab on and reach for the top. I’ve had great success “growing up” both cucumbers and squash.
Or consider creating an A-Frame. This year, it’s doing exactly what I want it to. The squash are all growing up the side of the frame (plastic frame with bird netting), and the sunflowers can be seen over the top of the A-frame and are just about to pop. The tomatoes are growing like weeds at the other end of the bed.
As much as I don’t want this summer to end….I am looking forward to harvest time, it’s going to be the best ever!
I was working in the garden the other day and was startled by what looked like a cluster of some strange type of alien creatures. I didn’t dare touch them for fear they would bite my hand off, or some equally insane incident, so I decided to leave them in peace while I did a little research.
Apparently they’re the best-tasting and safest to eat of all the wild mushrooms – Morel, is their name.
A spring-sprouting delicacy, morels can be found throughout regions of North America about the same time the trees start to bud and the trilliums start to bloom. Air and ground temperature along with rainfall amounts impact the growing cycle and crop bounty.
There are a number of varieties of morel – greys, yellows & creams (that’s what I’ve got), blacks and spikes and morel hunting seems to be a very common springtime adventure.
Lucky for me, I don’t have to venture any further than my back yard. And for now, I’m going to just leave them be and see what happens…just in case they really are alien Morels! But check out You Tube if you want to learn how to become a morel hunter. It’s quite interesting.
Oh…and they can sell for up to $60 per pound…wonder if I can increase my bounty?


 Black walnut trees can grace a yard, provide plenty of shade on hot summer days, and produce delicious nuts that both humans and squirrels enjoy. But those same trees aren’t always the best neighbours for the rest of the plants found in the garden.